PixelFlow – an image pixelating filter jQuery plugin using canvas
I had wanted to perform a makeover on this site and was playing around with a few things. I had been messing around with filters on images using css or svg, but they all seemed too standard. You’d see that on any site. And if I wanted to express my desire to push boundaries, then I would need to similarly push myself to create something I hadn’t seen elsewhere. That is when I stumbled on pixelating and decided to see what I could do.
How it works
PixelFlow follows a common jQuery plugin pattern whereby, $().PixelFlow([options]) is a base and if you want to call a specific function, this is passed as the first argument. Example:
// Instantiate/Create the initial PixelFlow
var $pix = $('img').PixelFlow({'resolution' : 32});

// returns the canvas that was generated from the image
// which is capable of being chained on.

$pix.PixelFlow('rebase').PixelFlow('simpleanimate', 32, 3000);

// This call will first return the pixelated image to
// the original look, and then animate back to the 32
// resolution filter.
Initial Options
The initial project was limited in goal so there are few options but it is built for more expansion.
//set up default options
var pluginName = 'PixelFlow'
  , defaults = {
    resolution : 16,
    offsetX : 0,
    offsetY : 0
  };
Methods
drawPixels – basic function that covers entire canvas in pixelation filter.
- No arguments.
$pix.PixelFlow('drawPixels');
// covers entire canvas with pixel filter
update – simple but necessary
- options [object] – new options to implement.
$pix.PixelFlow('update', {'offsetX' : 16});
// changes the offset in the x direction to 16
// pixels and re-draws the filter.
simpleanimate – animates resolution of pixels in the filter.
- endResolution [number] – goal resolution for the end of the animation
- duration [number] – time span of animation in millisecond
linearGradient – creates a horizontal gradient of pixelation.
- options [object]
- location [array] – requires 4 points in the following format [ start, gradientStart, gradientEnd, end]
default : [0, .25, .75, 1] - resolution [array] – requires [startResolution, endResolution]
default : [32, 0] - rebase [boolean] – rebase canvas to image before filtering
default : true.
- location [array] – requires 4 points in the following format [ start, gradientStart, gradientEnd, end]
$pix.PixelFlow({'location' : [0,.5,.75,1], 'resolution' : [0,16], 'rebase' : true});
// generates a pixel gradient starting at 50% of the way
// across the canvas to 75% of the way across until the
// end of the canvas. Then stays at 16 resolution.
This function was my crown jewel and what I use to animate and create waves on the demo page.
Development
Now let’s talk about how I built this sucker. First, I found someone else who had created a pixel filter using canvas, here. From there I learned the basics of using canvas and proceeded to build on top of what they had created. The first major difference was the attachment to the $.fn object thereby converting it into a jQuery based plugin. I wasn’t planning on using much jQuery functionality internally, but it adds a level of abstraction so that future users can move away from the basics I have set down. Additionally, it contains easy instance management using the $.data function. Here’s the little jQuery boilerplate function I used. It is different than my normal boilerplate because within the function I am removing the initial img and replacing it with a canvas. Therefore, I wanted to make sure that the $().PixelFlow() call was going to return a chainable object.
$.fn[pluginName] = function () {
  var a = arguments
  	, o = a[0]
  	, $cvs;
  this.each(function () {
    var r = $.data(this,'plugin_' + pluginName);
    if(!r) {
      r = new PixelFlow( this, o );
    } else {
      if('undefined' === typeof o) {
        return $cvs.add(r.canvas);
      } else if('string' !== typeof o || !r[o]) {
        void jQuery.error("Method "+o+" does not exist on jQuery(el)."+pluginName)
      } else {
        r[o].apply(r,[].slice.call(a,1));
      }
    }
    if(typeof $cvs === 'undefined') $cvs = $(r.canvas);
    else $cvs.add(r.canvas);
  });
  return $cvs;
}
The first added functionality was a rebase function that allows the user to reset the canvas to the original image. A very simple function that was sorely lacking.
PixelFlow.prototype.rebase = function( options ) {

	this.ctx.drawImage( this.img, 0, 0 );

};
That’s it!
Next, I created a duplicate of the initial image data, so that I wouldn’t need to rebase prior to every re-draw. Otherwise, it would be pulling the pixel data from the previously pixelated canvas.
Finally, I developed the simpleanimate function, which animates from one resolution to another. This is when I discovered that there was some interference with the large pixels anytime the pixel resolution was less than 4 or an uneven integer. Hence the evenNum function:
var evenNum  = function( num ) {
	if(typeof num !== 'number') return NaN;
	return ~~num - ( ~~num % 2 );
};
The fun part
We have finally gotten to a point where the concept was pretty well explored and I wanted to start developing the gradients (the whole point): this is certainly where the code gets interesting.
linearGradient
This was a complicated problem that I had been wrestling with in my head for a few days. Coming up with some crazy algorithm that would be able to calculate the step amount between each column of pixels that would incrementally decrease the pixel sizes until it reached the final size.
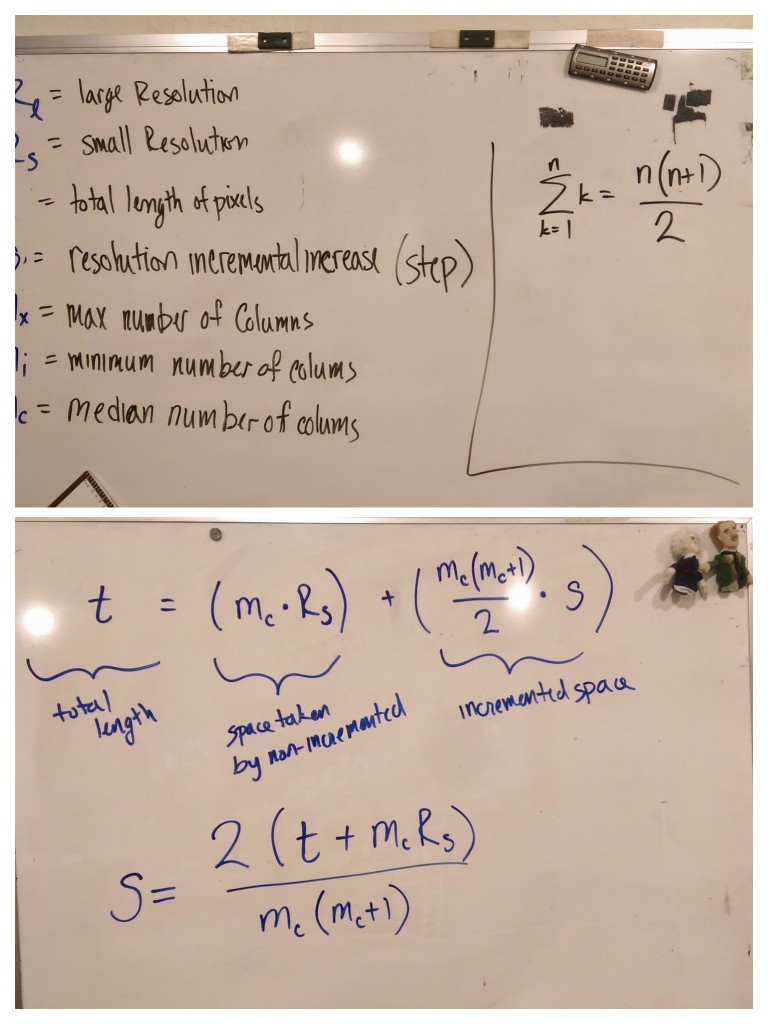
It was brilliant, and was totally going to work. Except for any zeros involved, or uneven placements, or any other numerous problems that were popping up one after another. After about 30 min of debugging I created a simple regression equation to calculate where the pixel size should be at that point in the gradient. I quickly realized this was a much better solution; simple, effective, and foolproof. Why didn’t I just do that first, well because I’m human. Hopefully next time I will learn that extensive math usually isn’t the answer, but probably not. Below is the linearGradient function in it’s entirety. Though there is a separate function called (drawCol) which is not shown, but I felt you could assume what that does or just look at the source code. The craziness is in the addColRange function where I build on the array of pixel start and end locations to create different sections of the gradient.
PixelFlow.prototype.linearGradient = function( options ) {

	var options = $.extend({'location':[0,.25,.75,1],'resolution':[32,0],'rebase':true},options);

	if(options.rebase) this.rebase();

	if(options.location.length < 4 || options.resolution.length < 2) return console.error('You have not provided to necessary options for a linear gradient.');

	var startRes = evenNum(options.resolution[0])
		, endRes = evenNum(options.resolution[1])
		, startPoint = options.location[0] || 0
		, gradStart = options.location[1] || 0.25
		, gradEnd = options.location[2] || 0.75
		, endPoint = options.location[3] || 1
		, offsetX = this.offsetX || 0;


	//TODO: handle percentages

	// calculate cols
	var w = this.width
		, h = this.height
		, ctx = this.ctx;

	// points to pixels
	startPoint *= w;
	gradStart *= w;
	gradEnd *= w;
	endPoint *= w;

	var cols = [];
	if(startRes > 0) cols.push(evenNum(startPoint));

	// modify start points for best spacing
	// gradStart -= (gradStart - startPoint) % startRes;
	// gradEnd += endRes - (( endPoint - gradEnd ) % (endRes || 1));

	function addColRange(arr, leftStart, startWidth, endWidth, rightEnd) {

		if(rightEnd < leftStart) return;

		if(startWidth === endWidth) {
                        // not gradient, just loop through until endpoint
			if(startWidth === 0) return;
			// if(leftStart - rightEnd < startWidth) return;
			var place = leftStart;
			while (place <= rightEnd) {
				place += startWidth;
                                // sub even pixels negatively affects presentation
				cols.push(evenNum(place));
			}
		} else {
                        // build gradient
			var Rl = startWidth || 4; // in case resolution is zero
			var Rs = endWidth || 4;
			var t = rightEnd - leftStart;
                        // mx = max number of pixels blocks across gradient
			// var mx = ( t / Rl );
                        // mi = min number of pixels blocks across gradient
			// var mi = ( t / Rs );

			// var mc = Math.floor( ( mx + mi ) / 2 ); // average
                        // s = step to get from start resolution to end
                        // resolution incrementally
			// var s = 2 * ( t - ( mc * Rs ) ) / ( mc * ( mc + 1 ) );
			var place = leftStart;
			var cWidth = startWidth;
			var exp;

			do {
                                // remnents of s have been removed but initially
                                // drove this section until the below equation

				// linear regression relationship but could be changed
                                // TODO: allow regression selection
				// TODO: bezier curve regression
				exp = Rl - ( (Rl - Rs) * ((place - leftStart) / t) );
				cWidth = exp;
				place += evenNum(cWidth);
				cols.push(evenNum(place));
			} while( place <= rightEnd && cWidth >= 2 );
		}

	};
	//calc cols from gradStart to startPoint
	addColRange(cols, startPoint, startRes, startRes, gradStart);
	addColRange(cols, cols[cols.length-1] || gradStart, startRes, endRes, gradEnd);
	addColRange(cols, cols[cols.length-1], endRes, endRes, endPoint);

	for(var c = 1; c < cols.length; c++) {
		this.drawCol( (cols[c - 1] + offsetX), ( cols[c] - cols[c-1] ) );
	}
};
Check out the demo stuff!! I do a bunch of cool stuff by animating the linearGradients (also see on home page). I also create waves using two different gradients back to back and turning off the rebase function for the second. Also, Greensock Tween is awesome.