Project 3a – Automatic Terrain Generation using Three.js
This is Project 3a because there would be an excessive amount of information if I put it all in a single post. Instead, this post will focus on the initial exploration of Three.js and all of the initial problems I encountered. Despite that reduction in scope, this post will probably still be long because I want to explain everything with the hope that someone else will be able to learn from it (demo).
For those who don’t know, Three.js simplifies the use of WebGL to allow the creation and animation of 3D objects in the browser. As they state themselves, “While a simple cube in raw WebGL would turn out hundreds of lines of Javascript and shader code, a Three.js equivalent is only a fraction of that.” It is very powerful with some great examples on their site of its implementation around the web. However, the problem with their examples and documentation is the lack of commenting and real information for the newcomer. This can be very frustrating for someone trying to use Three.js who has no previous experience with WebGL. My plan with all posts is to present the information for someone who has little experience with the specific topic to provide a tutorial of sorts and answer questions they may have. I do, however, expect any reader to have completed the initial Three.js introduction and understand the basics described there. Let’s get started.
The requirements of this project were:
- Using three.js, design a terrain generation system, with terrain based on a simple grid (similar to the old Sim City 2000). Unlike Sim City, terrain can have n-level slants (versus Slim City’s 1-level slant).
- Each tile is either a slant or a flat square.
- Terrain should be generated using biomes and one of several well known generator techniques like Perlin Noise, Midpoint Displacement(diamond-square), etc.
- Enhance terrain with landscape. Distribute plants, plant trees, and apply texture to the terrain.
- At least one small city should be spawned at random upon the terrain. Creative assets have been provided. The city/cities can be pre-formed, but should be placed at random once terrain is generated.
- Entities populating the terrain should be represented as an object, easily accessible via the console: $.info(“entityID”). Follow the GeoJSON spec to represent these (geographic) data structures.
- The 3D environment should have basic controls, allowing for simple navigation, zoom, and camera pan (three.js has plugins to help with this). The environment should also follow the same lighting patterns/rules as Earth.
Bonus Points:
- Use triangles, hexagons, or particles instead of squares.
- Exclusively listen to Carbon Based Lifeforms while developing.
- Finish on time.
Right… First, let’s figure out what all of these mean. If you are in my age group you probably remember SimCity 2000 but here is a refresher. We are building a semi-voxel terrain with large, flat spaces for buildings; and these are going to be the objectives tackled in this part A. The randomness of the terrain must be generated by one of the common techniques used by industry. As for the random distribution of plants and buildings, I am waiting for part B to implement it.
Now for the code(download and demo links at the end). I decided to also explore abstraction and encapsulation in this project so I created a function object of the terrain that can be instantiated. If you don’t know, this is an object oriented programming concept that can have advantages in segregating and shielding functions and variables, or read this. Here is the outline of that object so that it doesn’t get overwhelming:
var Terrain_Grid = function(size){

	var standards = {
		width: size.width || 5,
		length: size.length || 5,
		squareWidth: size.squareWidth || 20,
		vary: size.vary || 3
	}

	var width = standards.width, //default 5 : x direction
		length = standards.length, // default 5 : z direction
		area = width*length,
		squareWidth = standards.squareWidth,
		halfSquareWidth = squareWidth/2,
		vary = standards.vary;

	function generateHeight( width, length, vary ) {};

	function averageHeight(data){};

	function generateElement(){};

	var terrainObj = generateElement();

	return {

	};
}
You will see instantiations of this in the html document. I left in the variables intact because they are fairly simple. I did implement a concept I learned during this project, where I utilized the OR operator to establish defaults if I didn’t want to change all of the variables (full explanation). You can also see that I generate the mesh object at the end and set it equal to terrainObj. Later, you will see that I return that object and how it is used.
The generateHeights() function is the one borrowed from an example on the Three.js site. It utilizes the Perilin Noise method for creating a random but coordinated height map.
function generateHeight( width, length, vary ) {

		var size = width * length, data = [],
		perlin = new ImprovedNoise(), quality = 1, z = Math.random() * 100;

		for ( var i = 0; i < size; i ++ ) {

			data[ i ] = 0;

		}

		for ( var j = 0; j < vary; j ++ ) {

			for ( var i = 0; i <= size; i ++ ) {

				var x = i % width, y = ~~ ( i / width );
				data[ i ] += Math.abs( perlin.noise( x / quality, y / quality, z ) * quality * 1.75 );


			}

			quality *= 5;

		}

		data = averageHeight(data);
		return data;

	}
I variablized one number from the original to allow for changes in the intensity of the noise which affects the gap between the highs and the lows. Also, notice the point where x and y are calculated directly above the set point. For y, they use a property of javascript where the double tilde acts as a floor function (a single tilde returns a binary NOT). If I left the function as it came then it would create a very rough terrain that is organic but not conducive to building cities. Therefore, you may have noticed I call a separate function at the end, averageHeight(array). This function takes the heights array, finds the average, subtracts the average from every height, and brings any negative heights to zero. As you'll see in the demo, it creates naturally shaped, flat valleys.
function averageHeight(data){
		var totalH = 0, l = data.length;
		for(var i = 0; i<l; i++){
			totalH += ~~data[i];
		}
		var averageH = totalH / data.length;

		for(var i = 0; i<l; i++){
			data[i] = data[i] - averageH*.8;
			if(data[i] < 0){
				data[i] = 0;
			}
		}

		return data;
	}
I actually only subtracted 80% of the average value simply because I looked better. I also used the double tilde because js was having trouble adding the floating point numbers that were stored in the array.
The next function is the main, mesh generating function. But, I need to explain the conceptual method used to map the shape first. The first terrain object I imagined and created wasn't boxy enough. Instead I imagined this strategy.
From the picture below you can see I still used the basic grid but switched z and y axes so that the viewer would be looking from the side (in Threejs positive x is to the right, positive y is up, and positive z is towards the user).
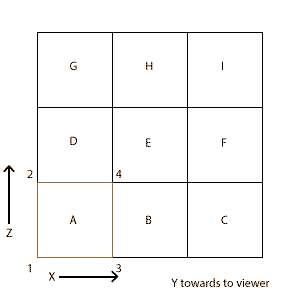
I use the abstract THREE.Geometry object store all of the vertices and face mappings. The vertices are generated in sets of 4, and define the corners of each flat square. I create the Vector3's for A (1,2,3,4) and push them into the vertices array in my geometry (var shape). (A Vector3 is essentially a reference to a point from the origin.)
shape.vertices.push( new THREE.Vector3( x * squareWidth, ~~(heights[index]*squareWidth/2 - 100), z * squareWidth));
shape.vertices.push( new THREE.Vector3( x * squareWidth, ~~(heights[index]*squareWidth/2 - 100), (z + 0.5) * squareWidth));
shape.vertices.push( new THREE.Vector3( (x + 0.5) * squareWidth, ~~(heights[index]*squareWidth/2 - 100), z * squareWidth));
shape.vertices.push( new THREE.Vector3( (x + 0.5) * squareWidth, ~~(heights[index]*squareWidth/2 - 100), (z + 0.5) * squareWidth));
From here I generate two Face3's (all faces are triangles) by passing in an array of vertex indices.
index1 = index*4; //bottom left
index2 = index*4 + 1; // top left
index3 = index*4 + 2; //bottom right
index4 = index*4 + 3; //top right

shape.faces.push( new THREE.Face3(index1, index2, index4));
shape.faces.push(new THREE.Face3(index1, index4, index3));
//reverse faces
shape.faces.push( new THREE.Face3(index1, index4, index2));
shape.faces.push(new THREE.Face3(index1, index3, index4));
The "index" refers to the index of the loop it is in and it is multiplied by 4 to account for the fact that 4 vectors are created each round. Reverse faces allow for the face to be seen from both sides. The next round, initally generates square C as described above, and you may have noticed that the square only spanned half of the squareWidth distance (x + 0.5).

This is because square B completes the box in the x direction. B is created because C is not x=0, it is x=1. Similarly, when square G is reached (3rd loop), square D is created by connecting G to A. When square I is created (round 4, index = 3), E is generated. The following conditionals do the connector squares:
if(x != 0){ //if not the first column, then add connecting square behind
	shape.faces.push( new THREE.Face3(index1, index1-2, index2));
	shape.faces.push( new THREE.Face3(index2, index1-2, index1-1));
}
if(z != 0){ // if not the first row, then add connecting square to lower row
	shape.faces.push( new THREE.Face3(index1, index4-(width*4), index2-(width*4)));
	shape.faces.push( new THREE.Face3(index1, index3, index4-(width*4)));
}
if(x != 0 && z != 0){ // if not the first row and first column, then add fill in triangles
	shape.faces.push( new THREE.Face3(index1, index4-(width*4)-4, index3-4));
	shape.faces.push( new THREE.Face3(index1, index2-(width*4), index4-(width*4)-4));
}
After all of the vertices and faces have been generated do a few final steps. I enable Geometry.dynamic to allow for updating heights after creation (see the dropdown on the demo page). I compute the face Normals (essential for using directional lights). I create the material to paint the shape with. Finally combine the geometry and material into the mesh and make the object.
shape.dynamic = true;
		shape.computeFaceNormals();
		var material = new THREE.MeshLambertMaterial({ ambient: 0xFFFAD6, color: 0xB5AF7F, shading: THREE.FlatShading});
		var element = new THREE.Mesh(shape, material);
It took me DAYS and many peer consults to realize I needed Geometry.computeFaceNormals() for a custom Geometry in order to use a directional light, though now it makes full sense. In order for the renderer to calculate the effect of the directional light on a face, the face needs a normal: I just figured they were automatically calculated. This applies to any custom Geometry and any non-omniprotent light, or: Spotlights, PointLights, and AreaLights.
Last is the returned object. This returns the Mesh as .element, the geometry as .geometry for convenience, and an update function.
return {
		element : terrainObj,
		geometry : terrainObj.geometry,
		update : function(size){
			width = size.width || standards.width; //default 5 : x direction
			length = size.length || standards.length; // default 5 : z direction
			area = width*length;
			squareWidth = size.squareWidth || standards.squareWidth;
			halfSquareWidth = squareWidth/2;
			vary = size.vary || standards.vary;

			heights = generateHeight(width, length, vary);
			for(var i =0; i<area; i++){
				for(var j=0; j<4; j++){
					terrainObj.geometry.vertices[i*4+j].y = ~~(heights[i]*squareWidth/2 - 100);
				}
			}
			terrainObj.geometry.computeFaceNormals();
			terrainObj.geometry.verticesNeedUpdate = true;
			terrainObj.geometry.normalsNeedUpdate = true;

		}
}
The update({}) function allows for updating the vertice heights (y value here) only instead of rebuilding the entire mesh (this is less expensive then remove/add new). That covers the Terrain_Grid abstract object. Again, the whole script can be downloaded from a link below. Now I will present the html file.
I start with a standard HTML file with some styling in the head tag:
<!DOCTYPE html>
<html lang="en">
	<head>
		<title>devNimlos - Terrain_Grid.js</title>
		<meta charset="utf-8">
		<meta name="viewport" content="width=device-width, user-scalable=no, minimum-scale=1.0, maximum-scale=1.0">
		<style>
			html {
				height: 100%;
			}
			body {
				font-family:sans-serif;
				font-size:13px;
				text-align:center;

				background-color: #0f0f0f;
				margin: 0px;
				overflow: hidden;
				position: relative;
				height: 100%;
				width: 100%;
			}
			div#container {
				height: 75%;
				width: 75%;
				top: 100px;
				right: 150px;
				position: absolute;
				background-color: #000;
			}

			#info {
				color:white;
				position: absolute;
				top: 0px; width: 100%;
				padding: 5px;

			}
			#inputs {
				position: absolute;
				top: 100px;
				right: 0;
				width: 150px;
				color: white;

			}
			#inputs div {
				position: relative;
				padding-bottom: 30px;
			}

			a {
				color: red;
			}
		</style>
		<script src="//ajax.googleapis.com/ajax/libs/jquery/1.10.2/jquery.min.js"></script>
	</head>

	<body>
The body tag contains the main course scripts:
<body>
		<div id="container"></div>
		<div id="info">scroll = zoom, click & drag = rotate, right-click & drag = pan</div>
		<div id="inputs">
			<div style="font-size:24px;">
				Modify Terrain
			</div>
			<div>
				<label>Variability</label>
				<select name="variability" >
					<option value="2" >Low</option>
					<option value="3" selected="selected">Default</option>
					<option value="4" >High</option>
				</select>
			</div>
		</div>
		<script src="js/three.min.js"></script>
		<script src="js/Terrain_Grid.js"></script>
		<script src="js/ImprovedNoise.js"></script>

		<script src="js/TrackballControls.js"></script>

		<script src="js/Detector.js"></script>
		<script src="js/stats.min.js"></script>

		<script>

			if ( ! Detector.webgl ) Detector.addGetWebGLMessage();

			var container, stats;

			var camera, controls, scene, renderer, terrain;
			var shapes = [],
					squareWidth = 40,
					width = 40,
					length = 40,
					numSquares = width*length,
					height=0;

			init();
			animate();
The above is the general set-up and global variables and this is followed by the actual functions. The primary function is init().
function init() {

	camera = new THREE.PerspectiveCamera( 60, (window.innerWidth) / (window.innerHeight), 1, 20000 );
	camera.position.z = length*1.5*squareWidth;
	camera.position.x = width*1.5*squareWidth;
	camera.position.y = 3000;

	camera.lookAt(new THREE.Vector3(width/2*squareWidth,0,length/2*squareWidth));


	// world

	scene = new THREE.Scene();

	terrain = new Terrain_Grid({
		'width':width,
		'length':length,
		'squareWidth':squareWidth
	});
	scene.add(terrain.element);


	// lights

	var light = new THREE.AmbientLight( 0x404040 ); // soft white light
	scene.add( light );

	var dirLight = new THREE.DirectionalLight(0xFFFFFF, 1);
	dirLight.position.set(.5, 0.5, 0);
	scene.add(dirLight);


	// renderer

	renderer = new THREE.WebGLRenderer( { antialias: false } );
	renderer.setSize( window.innerWidth*.75, window.innerHeight*.75 );

	container = document.getElementById( 'container' );
	container.appendChild( renderer.domElement );

	stats = new Stats();
	stats.domElement.style.position = 'absolute';
	stats.domElement.style.top = '0px';
	stats.domElement.style.zIndex = 100;
	container.appendChild( stats.domElement );

	//

	window.addEventListener( 'resize', onWindowResize, false );

	//

	controls = new THREE.TrackballControls( camera, renderer.domElement );

	controls.rotateSpeed = 1.0;
	controls.zoomSpeed = 1.2;
	controls.panSpeed = 0.8;

	controls.noZoom = false;
	controls.noPan = false;

	controls.staticMoving = true;
	controls.dynamicDampingFactor = 0.3;

	controls.keys = [ 65, 83, 68 ];

	controls.addEventListener( 'change', render );

	render();

}
You can see I use a standard camera set-up with an aspect ratio of window.width/window.height and visibility from 1 to 20,000. I position it and then have it look at the center of the terrain mass. Then I create the scene and terrain, adding the latter to the former. I add an omnipresent light (Ambient) and a directed light. Next, I add the renderer: slightly scaling it down and appending it to the div#container I have in the body. I add the Stats plugin used in the Threejs examples, mostly because it was in every example I was looking at. Most of the controls are just standard settings mimic'd from other examples, though I did some troubleshooting to allow clicking elsewhere in the document. I simply need to pass in the renderer.domElement and make sure that this element had already been created. These were just taken from already functioning pages so I couldn't really explain them to you yet (maybe a later project!).
function onWindowResize() {

	camera.aspect = window.innerWidth / window.innerHeight;
	camera.updateProjectionMatrix();

	renderer.setSize( window.innerWidth, window.innerHeight );

	controls.handleResize();

	render();

}

function animate() {

	requestAnimationFrame( animate );
	controls.update();

}

function render() {

	renderer.render( scene, camera );
	stats.update();

}
The html document ends with a listener on the remake button to trigger the update or rebuild based on the new selections. To save calculations, if the width selection has not changed then it only runs the update() function for heights. Otherwise, the function completely removes the previous element and rebuilds it using the new selected options.
			$(document).ready(function(){
				$('button#remake').click(function(){
					if(width == $('[name="size"] option:selected').val()){
						terrain.update({'vary': $('[name="vary"] option:selected').val()});
					} else {
						width = $('[name="size"] option:selected').val();
						length = $('[name="size"] option:selected').val();
						scene.remove(terrain.element);
						terrain = new Terrain_Grid({
							'width':width,
							'length':length,
							'squareWidth':squareWidth,
							'vary': $('[name="vary"] option:selected').val()
						});
						scene.add(terrain.element);
						camera.position.z = length*1.5*squareWidth;
						camera.position.x = width*1.5*squareWidth;
						camera.position.y = 3000;

						camera.lookAt(new THREE.Vector3(width/2*squareWidth,0,length/2*squareWidth));
					}
					render();
				})
			});

		</script>

	</body>
</html>
That was a long post. If you have questions about anything that I didn't make clear feel free to email me (see footer) and I can edit the post. Here are the links: demo and part b. Here are the downloads: html file, Terrain_Grid1.js, ImprovedNoise.js, Detector.js, TrackballControls.js, three.min.js, and stats.min.js. Additionally, all of these are available through threejs.org in their examples.